Subtotal €0.00
Shipping To determinate
Total (VAT incl.): €0.00
PVC-U butterfly valve mounting kit with movable flange
search
  • PVC-U butterfly valve mounting kit with movable flange

PVC-U butterfly valve mounting kit with movable flange

9119
  • PVC accessories kit for butterfly valve assembly
  • Includes flange sleeve, movable flanges and hardware.
  • Excellent strength and durability
  • Sizes from D63 to D250
€22.76
Diameter

+ shipping costs, see here
100% secure payments

Order it before 16:00 of tomorrow and receive it between Mon 29 April and Thu 2 May with Transporte MomentosPiscina

Description

Butterfly valve accessories kit 

Cepex PVC fittings stand out for their quality, reliability and durability, as well as the guarantee with multiple certificates: AENOR, AFNOR, NF... 

PVC flanges are removable accessories that allow joining pipes, in this case we have a kit of accessories used for the assembly of the butterfly valve and is composed of flange holder sleeve, mobile flanges and screws. 

Discover our complete catalog and the technical characteristics in our tables. You will be able to adapt your installation with different sizes from 63 mm diameter to 250 mm diameter. 

Thanks to the PVC-U materials it is made of, it can be used in water, chemical and waste pipelines, among other sectors. 

Dimensions butterfly valve kit

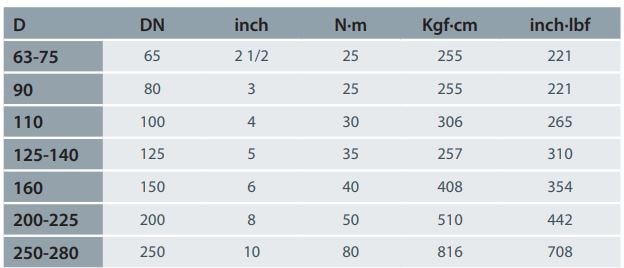
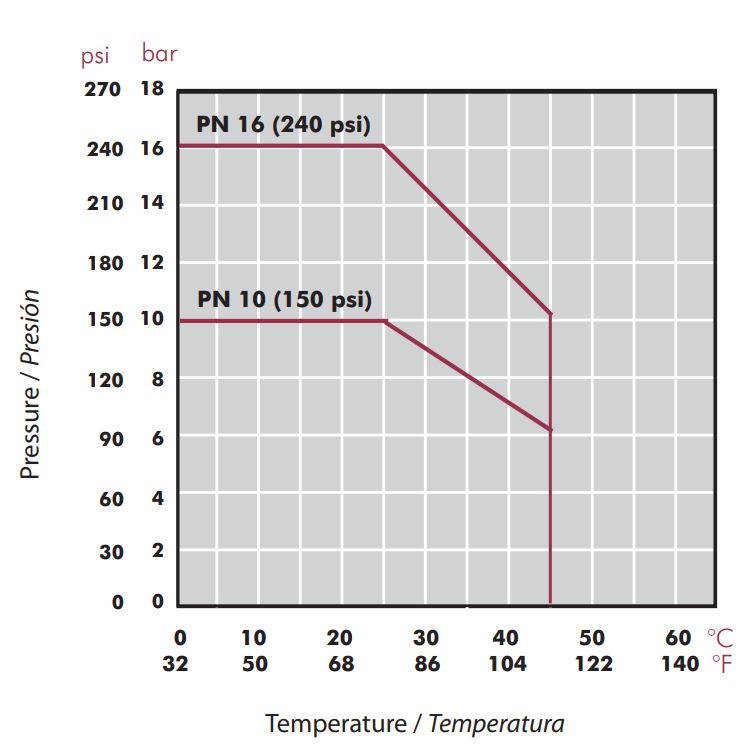
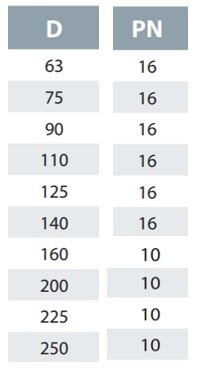
See the following table for the outside diameter and normal pressure of the butterfly valve assembly kit:

Dimensions butterfly valve kit

Butterfly valve assembly kit components

Butterfly valve assembly kit components

  1. Flange + sleeve
  2. Flat gasket (EVA or EPDM)
  3. Screw DIN 931
  4. Washer DIN 125-A
  5. Nut DIN 934

Mounting instructions

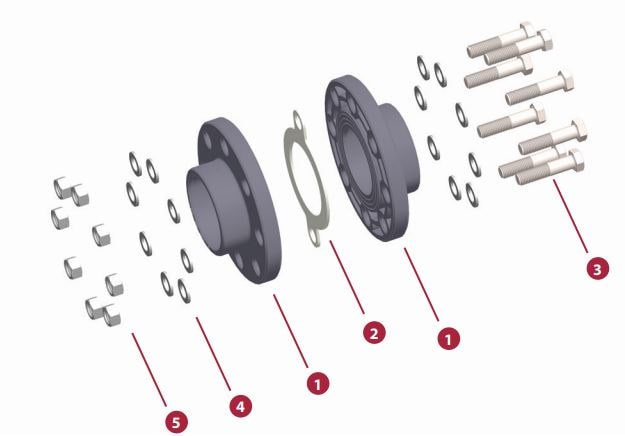
Flange mounting allows the mechanical connection between two elements of the installation. It is possible to combine different types of plastic or to join plastic elements with metal ones. 

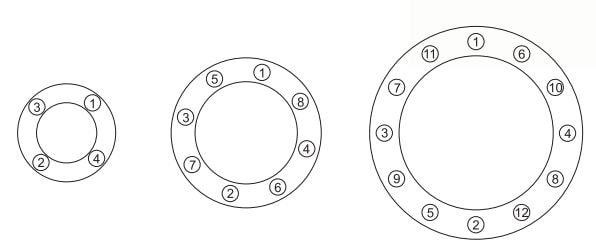
The flange connection requires two flange sleeves. There should be one flange on each side of the joint, which should have the same standard dimensions and hole layout. In this way the two flanges can be fastened together by means of bolts with matching holes. 

It is important to take into account:

  • Dimensions and arrangement of the flanges
  • Tightening order of the bolts
  • Tightening torque of the bolts
  • There must always be a gasket between the sleeves

Steps to follow for a correct assembly:

  1. Insert the flanges in each of the pipes.
  2. Join sleeve and pipe according to the applicable material and technology. Take into account the appropriate installation distance according to the element to be installed.
  3. Place the element to be installed or the gasket between the flanges.
  4. Insert the bolts with washers into the housings. 
  5. Install washers and nuts and tighten according to the order and torque specified.
  6. Re-tighten all bolts in the opposite direction.

Tightening order 

Tightening order

Maximum tightening torque 

Maximum tightening torque

Pressure / temperature diagram

Pressure / temperature diagram

Data sheet
Diameter
63
75
90
110
125
140
160
200
225
250
ean13
8435099212591